
Building an outdoor kitchen with cinder blocks is an affordable way to create your dream outdoor cooking area. So if you’re ready, here’s a quick snapshot of how to build an outdoor kitchen with cinder blocks:
Building an outdoor kitchen with cinder blocks:
- Plan and Design: Determine the location, size, and layout of your outdoor kitchen. Create a detailed plan including dimensions and features.
- Prepare the Site: Clear the area, level the ground, and lay a concrete foundation if necessary for stability.
- Gather Materials: Collect cinder blocks, mortar, rebar, a trowel, a level, and any additional materials such as countertops, appliances, and finishing materials.
- Lay the First Course: Spread a layer of mortar on the foundation and place the first row of cinder blocks, ensuring they are level and aligned with your plan.
- Build the Structure: Continue laying cinder blocks, applying mortar between each layer. Use rebar for reinforcement by inserting it into the hollow sections of the blocks and filling with mortar.
- Install Countertops: Once the cinder block structure is complete and the mortar is dry, place and secure countertops on top of the cinder block base.
- Add Appliances and Fixtures: Install your chosen outdoor kitchen appliances, such as a grill, sink, or refrigerator, according to manufacturer instructions.
- Finish and Seal: Apply a finish to the exterior of the cinder blocks, such as stucco, stone veneer, or paint. Seal all surfaces to protect against the elements.
And don’t worry. I’ll get into all the details and FAQs below.
With easy steps and budget-friendly tips, you can have a beautiful outdoor living space that enhances your cooking experience.
In this article, we will provide a step-by-step guide on how to build an outdoor kitchen using cinder blocks. You will learn some budget-friendly tips to help you design your dream outdoor cooking area.
Key Takeaways:
- Building an outdoor kitchen with cinder blocks is an affordable way to create your dream outdoor cooking area.
- With easy steps and budget-friendly tips, you can have a beautiful outdoor living space that enhances your cooking experience.
- A solid foundation is essential for your outdoor kitchen’s durability.
- Concrete countertops are durable and perfect for outdoor kitchens.
- Safety and durability are essential considerations for any outdoor kitchen.
Not sure of all the options and costs to build an outdoor kitchen?
In a recent article, I give you the complete guide to outdoor kitchen costs. So whether you want the ultimate kitchen with all the bells and whistles, or want to save as much money as possible, check that out to see all the options!
Just click this link to read it right here on my site – https://kitchenappliancehq.com/how-much-does-an-outdoor-kitchen-cost/

Planning and Designing Your Outdoor Kitchen
Before you roll up your sleeves and start constructing your outdoor kitchen with cinder blocks, it’s essential to plan and design your project carefully. Proper planning is crucial to ensure a functional and practical outdoor cooking area that meets your specific needs and fits seamlessly with your outdoor living space. Let’s explore some essential factors to consider for your outdoor kitchen plans.
DIY Projects and Outdoor Kitchen Design
One of the most significant advantages of building an outdoor kitchen with cinder blocks is that you can customize it according to your preferences and budget. However, to achieve a successful DIY project, it’s essential to have a clear design in mind. Sketch a layout that includes the desired appliances, storage, and seating areas, considering the available space and your desired height and counter space. The design should also complement the architectural style of your home and the surrounding landscape.
Proper Planning and Execution
Before breaking ground, it’s essential to ensure that your outdoor kitchen follows local building codes and ordinances. It’s advisable to consult with a professional contractor or architect to help you determine the best location for your outdoor kitchen and avoid common mistakes that may lead to costly repairs or safety hazards. They can also guide you on proper plumbing and electrical installations for your outdoor kitchen.
Functionality and Comfort
When planning your outdoor kitchen design, you should consider the practicality of the different elements. For instance, you should place the grill and cooking area in areas with easy access to the house and utilities such as gas lines and electricity. The seating areas should also be comfortable and well-shaded to enhance your outdoor living experience.
Overall, proper planning and design are critical elements that can significantly affect the end result of your outdoor kitchen project. Take your time to consider the essential factors such as the desired height, counter space, and available space to achieve a dream outdoor cooking area.

Choosing the Right Location
When it comes to outdoor kitchens, choosing the right location is key. You want a space that is functional, convenient, and enhances your outdoor living space. Here are some important factors to consider:
Outdoor Living Space
Before you start building, think about the size of your outdoor living space. You want to make sure that your new outdoor kitchen fits comfortably in your yard. Take measurements and make a rough sketch of the layout to get an idea of how much space you have to work with.
Enough Space
Make sure to allocate enough space for your outdoor kitchen. You don’t want it to feel crammed or cluttered. Consider the size of your grill island, countertop space, and any additional features you plan to include, like a sink or refrigerator.
Garden Hose
It’s important to have easy access to water for cleaning and cooking. Make sure your outdoor kitchen is located near a garden hose or that you have easy access to water through your plumbing system.
With these factors in mind, you’ll be able to choose the perfect location for your outdoor kitchen that will enhance your outdoor living space and provide a functional cooking area.
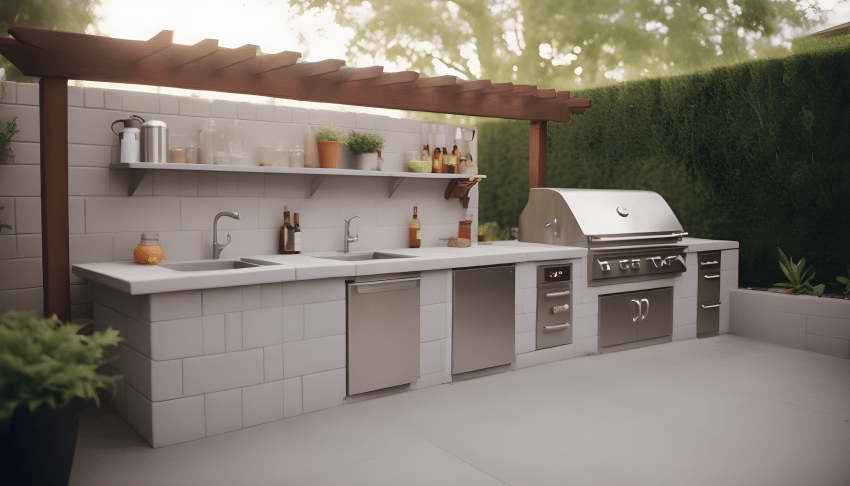
Building the Foundation with Cinder Blocks
In order to create a sturdy foundation for your outdoor kitchen, you will need to use cinder blocks on a concrete slab. This will ensure that your outdoor kitchen is not only durable, but it will also be able to withstand extreme weather conditions.
Laying the Cinder Blocks
Once you have chosen the cinder blocks, it’s time to start laying them. Make sure that you have laid out the pattern before you begin, and ensure that the blocks are level as you go. For added stability, consider adding rebar between the blocks, as well as a layer of mortar to keep them in place.
The mortar will also give the blocks a more decorative and expensive look.
Constructing the Grill Island
The grill island is the centerpiece of your dream outdoor cooking area. This section will guide you through constructing a grill island using materials like stainless steel, cement board, and stone veneer. Follow these easy steps and you’ll have a functional and aesthetically pleasing grill area.
- Build the frame: Begin by building the frame of your grill island using pressure-treated lumber. Make sure the frame is sturdy and level.
- Install the cement board: Next, install cement board to the frame using screws. This will provide a solid surface for your stone or tile work.
- Apply the stone veneer: Apply the stone veneer to your grill island, starting at the bottom and working your way up. Use a trowel to apply a layer of mortar to the cement board, then press the stones into place. Make sure you use a variety of sizes and shapes to create a natural look.
- Add the countertop: Add the countertop of your choice on top of the frame. Stainless steel is a popular choice for outdoor kitchens due to its durability and resistance to the elements. You can also consider a natural stone like granite or slate.
- Install the grill: Install your grill of choice into the grill island, making sure it’s level and secure.
With these steps, you will have a sturdy and attractive grill island that is sure to impress your guests. Take your outdoor cooking to the next level with this DIY project.
Building Concrete Countertops for Your Outdoor Kitchen
If you want a durable and budget-friendly countertop option for your outdoor kitchen, concrete is a great choice. With the right tools and materials, you can easily build concrete countertops that will last for years to come. Here’s a step-by-step guide on how to do it:
- Start by building a plywood base for your countertop. Use a circular saw to cut the plywood to fit the dimensions of your countertop area.
- Next, create a template for your countertop using foam insulation board. This will ensure that your countertop fits perfectly on the plywood base. Use a utility knife to cut the foam insulation board to fit the shape of your countertop.
- Mix the concrete according to the manufacturer’s instructions. You will want to use a high-strength concrete mix that is designed for countertops.
- Pour the concrete onto the foam insulation board, making sure to spread it evenly and fill any gaps. Use a trowel to smooth the surface of the concrete.
- Place rebar or wire mesh in the concrete to reinforce the countertop and prevent cracking. You can also add decorative elements like stones or tiles to the surface of the concrete at this point.
- After the concrete has set for 24 hours, remove the foam insulation board and sand the edges of the countertop to smooth them out.
- Seal the concrete with a food-safe sealer to protect it from stains and weather damage. Follow the manufacturer’s instructions for best results.
- If you have excess concrete, you can use it to create matching concrete pavers or other outdoor features.
With these easy steps, you can have beautiful and durable concrete countertops for your outdoor kitchen. Just remember to work carefully and follow safety guidelines when working with concrete.

Adding Additional Features
Now that you have the foundation and grill island in place, it’s time to add some exciting features to your outdoor kitchen. Here are some ideas:
Gas Grill
A gas grill is a must-have for any outdoor cooking enthusiast. It provides quick and easy heat that can be controlled with precision. Consider purchasing a stainless steel gas grill that is built to withstand the outdoor elements.
Pizza Oven
If you love pizza, consider adding a pizza oven to your outdoor kitchen. A brick pizza oven adds a rustic touch and allows you to create delicious homemade pizzas with the perfect crust. You can choose from a variety of sizes and styles to fit your outdoor living space.
Brick Veneer
Brick veneer is a popular option for adding a touch of elegance to your outdoor kitchen. It is a durable and fire-resistant material that comes in a variety of colors and patterns. Use brick veneer to cover your grill island or create an accent wall.
Outdoor Grill
An outdoor grill is a versatile addition to your outdoor cooking area. It can be used for grilling, smoking, and even roasting. Look for a grill with multiple burners and a side burner for added cooking options.
With these additional features, your outdoor kitchen will become a dream cooking area. Choose the ones that fit your needs and budget to take your outdoor cooking to the next level.
Ensuring Safety and Durability
Ensuring safety and durability are crucial considerations when building an outdoor kitchen. With exposure to extreme heat and the potential for fire, it’s essential to use fire-resistant materials and follow proper safety protocols.
When designing your outdoor kitchen, choose materials that are fire-resistant, such as stone veneer or cement board. These materials will withstand the high temperatures of outdoor cooking and minimize the risk of fire spreading.
Additionally, consider the placement of your outdoor kitchen in your outdoor living space. Make sure there is enough space between your kitchen and other structures to prevent any potential fire hazards.
Fire-Resistant Materials
Using fire-resistant materials is essential for ensuring the safety and longevity of your outdoor kitchen. Here are some common fire-resistant materials:
| Material | Pros | Cons |
|---|---|---|
| Stone Veneer | Durable and can withstand extreme heat | Expensive and heavy |
| Cement Board | Lightweight, inexpensive, and fire-resistant | Not as durable as stone veneer |
| Stainless Steel | Durable and easy to clean | Can become discolored over time |
Maximizing Lifespan
To maximize the lifespan of your outdoor kitchen, it’s important to take care of it properly. Covering it when not in use and cleaning it regularly will help prevent wear and tear from weather and use.
Consider investing in fire-resistant covers for your outdoor kitchen appliances, as they will protect them from the elements and prevent potential fire hazards.
By following these safety and durability tips, you can enjoy your outdoor kitchen for years to come, knowing that it is both safe and functional.
Adding the Finishing Touches
Now that your new outdoor kitchen is ready for use, it’s time to add those final touches that will take its design to the next level!
One great way to add an attractive and cohesive look to your outdoor kitchen design is by incorporating stone veneer. Stone veneer can be used to add a textured and natural look to your grill island, creating a stunning focal point for your outdoor living space.
When selecting the right stone veneer for your outdoor kitchen, consider the overall design and color scheme of the space. Choose a stone that complements the other materials used, such as the concrete countertops or stainless steel appliances.
You can also add additional touches such as lighting features or decorative accents. Adding soft lighting around your outdoor kitchen can create a warm and inviting atmosphere for evening gatherings. Decorative accents such as plants or outdoor art can also provide an extra pop of color and interest.
End Result
With all the finishing touches in place, step back and admire your new outdoor kitchen! You’ve successfully built a functional and stylish outdoor cooking area that enhances your outdoor living space.
From the proper planning and construction of the grill island to the selection of stone veneer and decorative accents, your new outdoor kitchen is sure to impress. Enjoy cooking and entertaining in your new space for years to come!
Not sure of all the options and costs to build an outdoor kitchen?
In a recent article, I give you the complete guide to outdoor kitchen costs. So whether you want the ultimate kitchen with all the bells and whistles, or want to save as much money as possible, check that out to see all the options!
Just click this link to read it right here on my site – https://kitchenappliancehq.com/how-much-does-an-outdoor-kitchen-cost/
Conclusion
Building an outdoor kitchen with cinder blocks is an excellent way to upgrade your outdoor living space. By following the steps outlined in this guide, you can create a dream outdoor cooking area that is budget-friendly and practical.
Remember to plan and design your outdoor kitchen properly before starting the construction process. Choosing the right location, building a solid foundation with cinder blocks and concrete slab, and constructing the grill island are crucial steps in ensuring the safety and durability of your outdoor kitchen.
Adding features such as gas grills, pizza ovens, and brick veneer can enhance your outdoor cooking experience and provide versatility in your cooking options. Concrete countertops are also a durable and stylish addition to any outdoor kitchen.
Finally, don’t forget to add those finishing touches that will make your outdoor kitchen truly unique. Consider adding stone veneer or other design elements that will complement your outdoor living space.
In conclusion, building an outdoor kitchen with cinder blocks is a rewarding DIY project that can be accomplished with the right tools and guidance. Start now and watch as your dream outdoor cooking area becomes a reality.
FAQ
How long does it take to build an outdoor kitchen with cinder blocks?
The time it takes to build an outdoor kitchen with cinder blocks can vary depending on the complexity of the design and your level of experience. On average, it can take anywhere from a few days to a couple of weeks to complete the project.
What materials do I need to build an outdoor kitchen with cinder blocks?
To build an outdoor kitchen with cinder blocks, you will need cinder blocks, a concrete slab, stainless steel appliances, cement board, stone veneer, and various tools such as a level, trowel, and saw. Additionally, you may need other materials depending on your specific design and desired features.
Can I build an outdoor kitchen with cinder blocks on a budget?
Yes, building an outdoor kitchen with cinder blocks can be a budget-friendly option. By using cinder blocks instead of more expensive materials and opting for DIY projects, you can save money without compromising on quality. Additionally, making smart choices in selecting appliances and design elements can help you stay within your budget.
Do I need a permit to build an outdoor kitchen with cinder blocks?
The need for a permit to build an outdoor kitchen with cinder blocks can vary depending on your local building codes and regulations. It’s always best to check with your local authorities to determine if a permit is required for your specific project.
How do I maintain and clean my outdoor kitchen with cinder blocks?
To maintain and clean your outdoor kitchen with cinder blocks, regularly remove any debris or food particles from the countertops, grill area, and appliances. Use a mild detergent and warm water to clean the surfaces, and avoid using harsh chemicals that could damage the materials. It’s also important to cover your outdoor kitchen during inclement weather and perform regular inspections for any signs of damage or wear.
Can I customize the design of my outdoor kitchen with cinder blocks?
Absolutely! One of the benefits of building an outdoor kitchen with cinder blocks is the flexibility it offers in terms of customization. You can choose different layouts, add unique features, and personalize the design to suit your preferences and outdoor living space.
Can I add a sink and plumbing to my outdoor kitchen with cinder blocks?
Yes, you can add a sink and plumbing to your outdoor kitchen with cinder blocks. However, it’s important to consult a professional plumber to ensure proper installation and adherence to local plumbing codes. Adding a sink can enhance the functionality of your outdoor kitchen and make it more convenient for food preparation and cleaning.
Are outdoor kitchens with cinder blocks durable?
Yes, outdoor kitchens built with cinder blocks are known for their durability. Cinder blocks are resistant to extreme weather conditions and provide a sturdy foundation for the structure. Additionally, with proper maintenance and care, your outdoor kitchen can withstand years of use and enjoyment.
Can I incorporate a fire pit or fireplace into my outdoor kitchen with cinder blocks?
Yes, you can incorporate a fire pit or fireplace into your outdoor kitchen design. Cinder blocks are fire resistant and can be used to construct the fire feature. However, it’s essential to follow safety guidelines and consult local regulations when installing a fire pit or fireplace to ensure proper ventilation and compliance.
Can I hire professionals to build my outdoor kitchen with cinder blocks?
If you’re not comfortable with DIY projects or prefer to have professionals handle the construction, you can hire contractors or outdoor kitchen specialists to build your outdoor kitchen with cinder blocks. They have the expertise and equipment to ensure a high-quality and efficient installation, allowing you to enjoy your new outdoor cooking area without the stress of construction.
Click Here to learn more about me. Click Here to learn more about my site. Editorial Policies.
- 35 Amazing Summer Dinner Recipes to Enjoy All Season Long - May 17, 2026
- Savory French Dip Sliders Recipe - May 17, 2026
- Roasted Garlic and Herb Flatbread Recipe - May 17, 2026